
The OLM file is the Outlook Mac application website. It is built keeping the macOS format under consideration. The user interface and the Outlook for Mac folder section are different from Windows Outlook, so whenever necessary to change your computer system from iMac to Windows, then you need to convert the OLM file to PST format.
There are additional restrictions related to OLM files as it can sync your contacts with Exchange Server, no calendar entry sharing, no activity list creation, no corresponding email preview, no Office 365 Group access, and much more. That can be overwhelmed if you transform the OLM file.
But you might think why a user wants to convert their OLM files to PST format, let us find out!
Why does a user want to convert OLM files to PST format?
There can be a variety of reasons for a user who tends to convert their OLM files to Outlook PST format. The reason can include
- Mac location availability or temporary activity in Windows location.
- Organization permanently changes Windows environment.
- Increasing the overall portability of email data (as the Windows environment is widely used).
- Ordered or received OLM files that are orphaned in the system and need access to their data
- Corporate integration and acquisition that leads to the Windows operating environment
- You need to use the Windows location temporarily
These can be the valid reasons for the users to convert their OLM files to Outlook PST format.
Now, after getting the reason, let us now know about the method of conversion of the OLM files to Outlook PST format.
Can we convert OLM files to PST format manually?
Yes, there is a manual solution for the users to convert OLM files to PST format manually, but this solution is a time-consuming process to be processed. But it is free of cost solution and that is the big reason for the users to search for the manual conversion. But manual conversion includes many sections, each section has some steps to follow.
Let us follow each of the sections as well as the steps:
Part 1: Create an IMAP account
Part 2: Attach Mac account with an IMAP account
Part 3- Convert Mac Outlook emails to an IMAP account
Part 4- Setup the Windows Outlook with an IMAP account
Now, let us have a look at the steps of each part.
Part 1: Create an IMAP account
- Open Gmail or another webmail and right-click on Settings
- In the “Settings” option select the “Transfer and POP / IMAP” tab.
- Now open the IMAP server and save the changes.
Part 2: Attach Mac account with an IMAP account
- Open the Outlook Mac application select the Tool tab and select Accounts.
- Now select an email and enter your email id, password, and other details.
- Install the IMAP server and select SSL connection and SMTP server and 465 as the port number, then right-click on the “Add Account” option.
Part 3- Convert Mac Outlook emails to an IMAP account
- Open Outlook for Mac OLM and select the item you need to move.
- Right-click on the selected folder and from the Move option and select Copy to Folder.
- Find the name of your IMAP folder and right-click the “Copy” button.
- After that update, the IMAP folder with the Send / Receive button and all your Mac Outlook emails will be moved to the IMAP account.
Part 4- Setup the Windows Outlook with an IMAP account
- Open the Control Panel and select Email and select Email Accounts and right-click on the “New” option.
- Select Customize server settings and right-click the “Next” button.
- Select IMAP / POP settings and click Next.
- Enter your IMAP account details and incoming and outgoing server information and click More Settings.
- Click on the Advanced tab enter the 993-port number on the IMAP server and select SSL connection.
- Enter the SMTP server port number as 465 select the SSL connection and click OK.
- Now click the Next button and then click the Finish option.
These are the steps that a user has to go through for the conversion of their OLM files to PST format manually. But this procedure can be hectic as users do face many problems while converting the OLM files to PST format manually. Let us look at these problems.
- A reliable solution is not provided
- Instant conversion is not done
- Takes a lot of time for the users
- Users have to take the technical assistance while converting their OLM files to Outlook PST format.
And many more such kinds of issues are faced by the users who tend to convert their OLM files manually.
Now, for the users who are looking for a reliable solution for the conversion, they can install this third-party OLM to PST converter tool.
A reliable solution for conversion
Installing this OLM to PST Converter tool is a reliable solution for the user who tends to convert their OLM files to Outlook PST format. Users do not face any hurdles while using this application. The steps are reliable to be followed by the user, let us follow these steps:
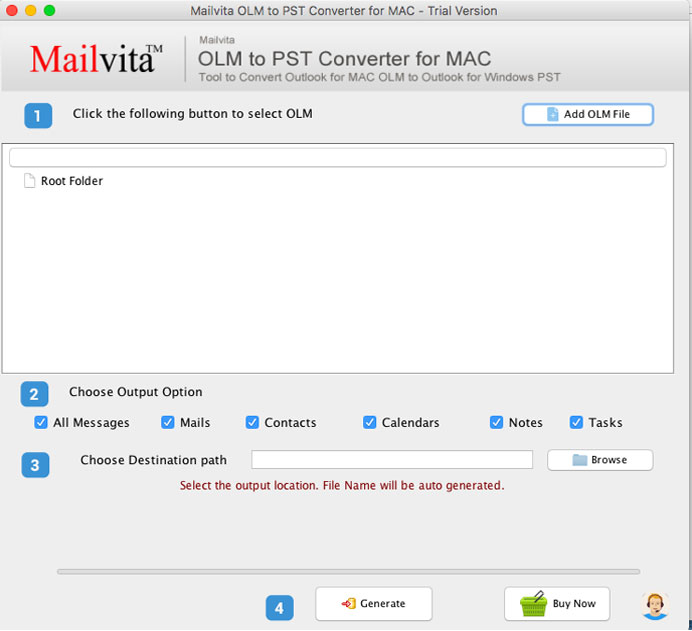
- First, install the OLM to PST Converter and then start the application
- Now, add the Mac Outlook .olm files that you want to convert
- Preview those files
- Add the path for saving the converted OLM files
- Finalize the steps by hitting the “convert now” button
These steps can be simply followed by any user who wants a reliable solution to convert their OLM files to Outlook PST format.
The application is an advanced tool that gives users a reliable platform for all the users. No data error is faced by the users who want to convert their OLM files to Outlook PST format. Users from any field or background can be able to use the application and follow the task of conversion.
Final Words
We have discussed the conversion of the OLM files to Outlook PST format. Users do not find any errors using the tool. And, a free demo version is also available for the users for letting them know more about the conversion of the OLM files to Outlook PST format.