If you have purchased a wireless Brother Printer, then the printer setup would slightly be different from the USB setup. So, if you have been hunting for a way to connect Brother Printer to wifi, then you have landed at the right place. This write-up will take you down the lane of connecting your wireless brother printer to wifi in Windows and Mac. In continuation to that, we shall discuss some frequently asked questions to make you understand everything in a better way.
Steps to connect brother printer to Windows 10 computer
Complete these steps in the same order as written below How to connect Brother Printer to Computer with wifi on Windows 10:
- From any web browser, go to https://www.brother-usa.com/brother-support/driver-downloads
- Choose brother printer model and choose the operating system.
- Download the driver for your Brother machine and double-click on the .exe file.
- Once done with that, go to the control panel of your printer.
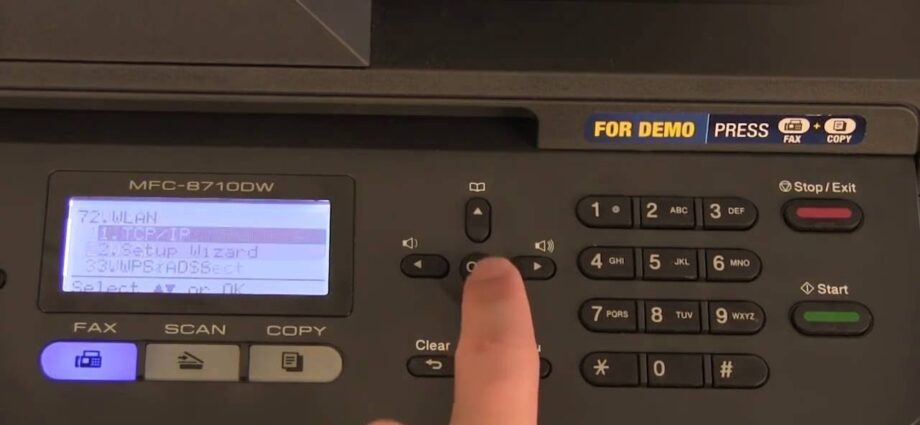
- Open the printer menu on your screen.
- Navigate to the ‘Network’ section and choose ‘WLAN.’
- Select ‘Setup wizard’ and hit the ‘Enter’ key when you see the wireless icon on your display.
- From the appeared results, choose your network.
- Enter the correct password for the same wireless network.
- Your printer will now be connected successfully.
Use these steps if you want to connect brother printer to laptop wirelessly.
Connect wireless brother printer to Mac PC
For Brother Printer wireless setup on Mac, just follow the instructions as given below:
- At first, install the Brother Printer driver from the support page.
- Next, double-tap on the downloaded file.
- Then, open the ‘Utilities’ folder.
- Choose ‘Wireless Device Setup Wizard.’
- Then, double-click on the file named ‘Wireless Device Setup Wizard.app.’
- Now, follow some easy instructions to complete the setup.
- Choose the desired wireless network and enter its password.
- Make sure you select the correct network SSID.
- The wireless connection would now be established.
Connect using Wi-Fi Direct
- Find out and note down the wireless settings of your Brother machine
- Using the USB cable, connect your printer and the computer.
- Now, run the printer setting tool.
- Turn on the Wireless Direct by going to the Wireless LAN tab.
- Locate, press, and hold the Wi-Fi button on your printer.
- Wait for a minute and see if the light is flickering or not.
- Now, choose your network SSID and enter its password.
- If you see a Blue light, your connection was successful.
Steps to Fix Brother Printer Offline on Mac
How to fix Brother printer is offline error on mac. Sometimes, you may encounter the problem of not being able to print on Mac. Because, the printer keeps disconnecting and the printer does not respond to printing commands. Therefore, change a printer from offline mode to online mode by following given steps.
Once a USB or network printer is added to a Mac computer. You can send it documents to print. However, it can sometimes happen that a command from the printer causes an error and takes the printer offline, causes all jobs to print. To solve problem, download and install the latest version of brother printer drivers as per MacBook operating version.
How to get Brother printer back online Mac
When the Brother printer shows offline messages on mac. The reason why the printer is offline on Mac can be due to various reasons. Printer ranging from the simple event of the printer going into sleep mode to incorrect printer settings and problems with the USB ports or Wi-Fi network. In most cases, the problem can be fixed using the Reset Printing System option as available on Mac.
After resetting the printing system, you will need to add brother printer on mac. The first step turns OFF the printer or in sleep mode. Make sure there are no errors or blinking lights and that there is enough paper available in the input tray. If the printing problem is due to a small software bug or connectivity bug, it can often be fixed by restarting the printer. Reboot the printer and wait for a while. After restarting the printer, try to print something. If you still see the error “The printer is offline”, go to the next method.
How to fix Brother printer offline Mac
A system restart of the printer will remove the printer from Mac, allowing you to start over by adding the printer back to your device.
- Click on the Apple Menu Icon and click on “System Preferences”.
- On the System Preferences screen, click “Printers & Faxes”.
- Next screen, right-click the Offline Printer and click the Reset Printing System option in the context menu.
- In the pop-up window, click Restart to confirm.
Note: You may be asked to enter your Admin User ID and Password. After the printing system restarts, add the printer again and try to print something.
How do i stop my brother printer from going offline mac
- Open the Start menu and click the “Printers and Faxes” icon.
- Then a window will open with a list of all the printers currently installed on your computer.
- Double-click the icon of the printer that you want to change to connect.
- A pop-up window will open detailing all waiting print jobs.
- Uncheck and “Use Printer Offline” mode.
- It will switch the printer from offline mode to online mode.
- Open system preferences by clicking on the dock icon.
- Go to the printer and fax control panel which is in the Hardware category.
Select the printer you want to connect from the list on the left side of the screen. Click the “Resume Printer” button at the top of the queue window to bring the printer online.
Read more article on this website