You can resolve printer offline problem with in-built features in windows 10. If offline printer issues is still not resolved then download the latest version of printer drivers as per your computer specifications and re-install the printer on your desktop.
Steps to fix Brother printer offline issues in windows 10
- Click on the windows 10 start Button and Type “Printers & Scanners” in the search Box.
- Printers setting screen opens on windows and click on your printer model.
- Click on the “Manage Button”, next to open queue.
- Next, click on the Run The troubleshooter.
- Windows 10 start Detecting Problem ( Checking for errors).
- Wait for a second, and windows 10 display the error behind the printer offline.
- On this windows , click next if any problem displayed and resolve the problem itself.
- Final click to close the troubleshooter.
- Further, print a test page.
What to do when Brother printer connected to Wi-Fi but offline
Brother printer offline but connected to wifi – Verify the printer powered is ON with no such errors and follow the troubleshooting steps to bring printer back online.
- If your printer’s LED light is off, then printer must be powered off. power on your printer or check machine that it is not in the sleep mode.
- Check your plug or power supply also. If you are unable to power on the printer, then this solution does not apply. Then you need to solve the power supply issue first.
- Check your screen that there are no messages flashed like Paper Jam or Ink/Toner Empty
- First, confirm that your wireless router or access point is set up.
- Check your SSID or the name of your wireless network, and your wireless network key. You may have to ask your network administrator or Internet provider for it.
- Place the machine close to the router for a better network.
- Confirm that the machine is turned on Menu.
- Select and press OK and Setup Wizard and press OK.
- Select your network and press OK”
- Enter your Password and press “OK”.
How to connect a Brother printer to your Mac wirelessly: Step by step guide
Follow these steps to connect your Brother printer to your Mac wirelessly:
- Take a note of the Service Set Identifier (SSID) and password of your network.
- On the display of the printer look for and Press the Menu or Settings option.
- Select the wireless network option.
- Your printer will search for nearby networks and a list of networks will display.
- Select the network you use.
- Enter the password for the network and Press OK.
- The printer should establish a wireless connection and connect to the Mac.
- Insert the setup CD into your MAC or download the drivers for the printer from the Brother official website.
- To install the driver follow the on-screen instructions or Click on the downloaded file and follow the on-screen instructions.
- Restart your printer so it picks up the installed driver.
- Select System Preferences from the Apple Menu on your Mac.
- Choose Print and Scanners, Print & Fax and Print and Scan. Click on Add.
- On the Default list dropdown option. Find and Highlight your printer name and Click Add.
- The printer should now be added to the Mac.
- Click on Quit System Preferences to end the setup.
Brother HL-L2340DW WiFi setup Mac
- Download the driver from the Brother official website.
- Navigate to the install file and double click to begin.
- Click on the start here Icon, in the next window click Open, then Next.
- Choose Wireless Network Connection and click Next.
- A detecting Existing Wireless Network Settings window will appear.
- Make sure your network is displaying and Click Next.
- The setup wizard will automatically connect your settings and printer to the network.
- Your printer should show in the machine install window. Select your printer and install the printer.
- Your printer should be ready to use so that you can learn here the steps to Setup brother printer wifi mac
Brother printer not connecting to Mac
If your printer is not connecting you your Mac here are a few steps to try out:
- Go to the Apple Menu.
- Choose settings and preferences.
- Click on Printers and Scanners.
- On the Keyboard hold down the Control Key.
- Select the Reset printing system option.
- After the reset, the list of printers should be empty.
- Add the brother printer again to be able to begin printing.
Brothers are an All-In-One printing solution that will probably satisfy most, if not all your printing requirements.
How to Add Brother Printer To Computer
Dear Friends Most Of The Time Windows Will Automatically Add Your Printer to the Printer List.
But In Case If Your brother Printer Is Not In Your Printer List Please Follow these steps to Add Your Brother Printer
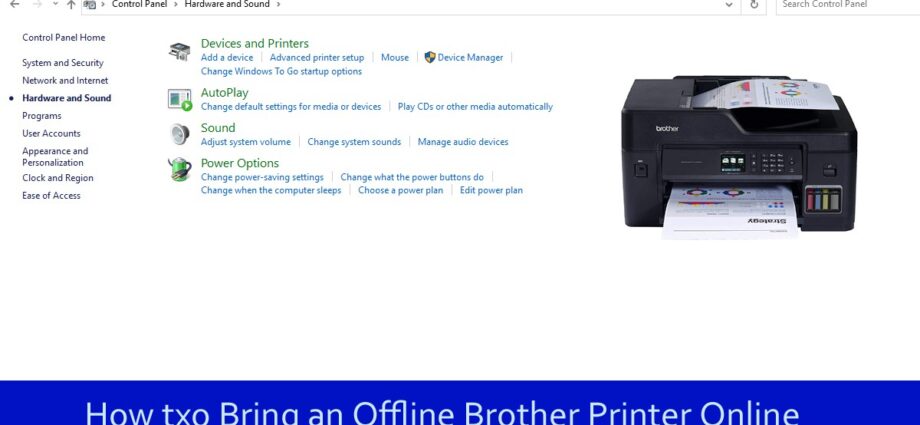
- Please Go to Control Panel >Hardware And Sound>Device And Printers.
- On The Right Hand Top Click On Add a Printer
- Select “Add a network, wireless or Bluetooth printer” and click Next.
- Now Windows Will scan for the printer and if detected, select the printer and click Next.
- If Your printer is not listed, click “The printer that I want isn’t listed” and skip to add the printer by name or TCP/IP address.
- We Will Recommend You To Add Your Printer Using TCP/IP
- Select “Add a printer using a TCP/IP address or host name”.Click Next.
- Now Type Your Printer IP Address and Click Next.
- For Printer IP Address Please Login To Your Wireless Router And Look For Connected Clients Or Device Connected.
- Here You Can See Your Printer Connected And See The Printer IP Address.
- Now You Can Use This IP To Connect Your Printer.
Go to the Homepage for more information and post.