A dying or cracked display doesn’t mean your notebook is a paperweight. For most notebooks, a screen replacement takes up to an hour. If you’re a good do-it-yourselfer, replacing your broken notebook screen yourself will save you money.
Here are step-by-step instructions on how to replace your notebook screen
What to see before replacing the notebook screen
Before you do anything, take a full look at your laptop to make sure the screen really needs replacing. For example, if the graphics card on your motherboard is bad, you may waste time and effort replacing a perfectly good display. Also, if the notebook has been impacted it could be physically damaged, we recommend that you double check for other damage as well.
To test your graphics card, you can connect a desktop monitor, notebook screen or TV to your laptop, as most have a standard blue VGA monitor and / or HDMI output. If the image looks good on an external display, your graphics card is probably good and the screen is dead. If you don’t get any picture it might be broken. We must bear in mind that some laptops require pressing certain function keys on the laptop to activate the external display output. If you do this and the video still doesn’t show, the chances are that the graphics card and / or motherboard is broken, rather than the screen. Internal Link
If the notebook images are successfully displayed on another screen, use the computer for a while to make sure that the keyboard and other components of the notebook are functioning normally. Before replacing the notebook LCD, here are the warnings for the following general steps. This is not meant to be a guide for ultra books, two-in-one notebooks, tablets, MacBook Repair in Dubai or other more particular notebooks. It is suitable for traditional laptops. Bear in mind that it is not a universal guide as even the general steps I discuss do not work for all “traditional” laptops.
How to choose a replacement screen for your notebook
Before purchasing a new LCD, it may be a good idea to first try to remove the damaged screen to make sure you can perform the replacement. If, after following the first steps, the process seems complex for your notebook, I recommend that you contact our center. Finding a replacement is typically straightforward, and you don’t have to pay the crazy prices the manufacturer usually wants. If you don’t find anything, try other identification numbers from the laptop label or documentation.
Some suppliers have one or two different sets of identification numbers which could act as a model number. When you buy the LCD, most sellers will advise you to compare the specifications and placement of the video cable on the back of their screen with the current one. This is another reason to open the laptop bezel before ordering a replacement. However, from my personal experience, if the vendor says the screen is compatible with the exact model of the Notebook, it usually works.
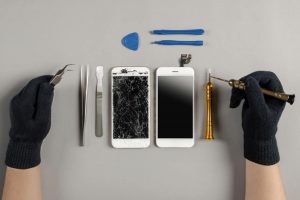
How to fix your broken laptop screen
Before starting, make sure you have the proper tools. Here’s what works for most notebooks: Table or other workspace – You’ll need a place to sit (or stand, if that’s your problem) with a flat area to work on your notebook. Small Head Magnetic Screwdriver: Not as small as a mini screwdriver from an eyeglass repair kit, but I’d say a medium sized screwdriver would work between sizes. If you don’t have a magnetic head screwdriver, try to find a magnet that is large enough.
This helps the screws adhere to the head, making it much easier to remove and replace screws without swearing as they fall all over the place. Safety pin or needle: it is used to remove the cover stickers that hide the screws on the surrounding laptop cover, called the bezel.
Plastic spatula or other thin object: This is optional, to help distance the display bezel from the case. If you’re using another object, make sure it’s thin enough but not sharp enough to leave scratches. Small bowl or other container: used to store the small screws and keep them safe.
General steps that work for most notebooks:
Make sure the laptop is unplugged from the AC power supply. Also remove the laptop battery.
Find the round cover stickers that hide the screws on the screen bezel, the case surrounding the screen. These stickers are usually found on the bottom of the bezel, near the display hinges, when opening the screen. You should find one on each side of the screen.
Use a pointed object, such as a pin or an open safety needle, to remove the lid stickers without damaging them. Stick it between the edge of the lid and the frame, then pull out the adhesive. Once removed, place the lids in a secure spot, with the sticky side facing up to ensure there is enough stickiness when you put them back on.
Use your screwdriver to remove the screws. Some screws are easy to remove; others, not so much. But moving the screen to the right position usually exposes the screws enough for removal.
Start carefully by prying the display bezel away from the back of the display case. Work with a thin, indiscreet object in the gap around the outside of the screen. The bezel usually attaches to the cashback with plastic buttons, so give it some strength as you pry, but not too much. You will feel the release of the fasteners as you pry.
Once you’ve unlocked the display bezel, it may or may not be easy to remove. If not, it’s probably stuck around the display hinges. Moving the position of the screen up or down, with a slight force if necessary, should completely free it.
You should now be able to set the LCD screen down on the keyboard. Be careful not to exert excessive force on the video cable connected to the back of the screen.
Disconnect the video cable from the back of the screen. Most laptops have the connector near the center. If so, keep in mind that the portion of the cable that runs along the screen is usually stuck to the back of the screen with a light adhesive. Just gently pull the cables from the screen. It is usually necessary to remove the tape that secures the video connector to the back of the display as well. When you get to the point of pulling the video cable out of the connector, you should pull it out with little force.
Fit the new screen into the side trim frame pieces, and then re-fasten it like the old one: usually three screws on each side of the trim frame pieces, and then one screw on each to secure it to the rear screen.
When it comes to the point of putting the faceplate back on, just line it up and push / press the faceplate into the snaps of the rear screen case. Before replacing the frame screws, make sure the frame is completely printed and unprotected. Finally, I use the pin or needle securely to reattach the sticky screw caps.
If all went well, you should now have a new working screen for your notebook. Put the battery back and try it out!
How to replace the notebook screen and Phone screen repair UAE
If you have encountered difficulties or it seems too complicated for your skills, try our Screen Replacement Service which is always at your disposal.
Call Quik Fix technologies at +971 523149307 or contact us from the site for a free consultation without obligation and to request a quote.